- Type>
- Adjust>
- Show Info...
- Properties...
- Color>
- Stacks>
- Hyperstacks>
- Crop>
- Duplicate...
- Scale...
- Translate>
- Rotate>
- Zoom>
- Overlay>
- Lookup Tables>
Type Submenu
Use this submenu to determine the type of the active image or to convert it to another type.8-bit
Converts to 8-bit grayscale. The active image must be 16-bit grayscale, 32-bit grayscale, 8-bit color or RGB color.ImageJ converts 16-bit and 32-bit images and stacks to 8-bits by linearly scaling from min-max to 0-255, where min and max are the two values displayed in the Image>Adjust>Brightness>Contrast tool. Image>Show Info displays these two values as the "Display range". Note that this scaling is not done if "Scale When Converting" is not checked in Edit>Options>Conversions.
RGB images are converted to grayscale using the formula gray=(red+green+blue)/3 or gray=0.299red+0.587green+0.114blue if "Weighted RGB to Grayscale Conversion" is checked in Edit>Options>Conversions.
16-bit
Converts to unsigned 16-bit grayscale. The active image must be 8-bit grayscale or 32-bit grayscale.32-bit
Converts to signed 32-bit floating-point grayscale. The active image must be 8-bit grayscale or 16-bit grayscale.8-bit Color
Converts to 8-bit indexed color using Heckbert's median-cut color quantization algorithm. A dialog box allows the number of colors (2-256) to be specified. The active image must be RGB color.RGB Color
Converts to 32-bit RGB color. The active image must be grayscale, 8-bit Color, or an RGB (red, green, blue) or HSB (hue, saturation and brightness) stack.RGB Stack
Converts to a 3-slice (red, green, blue) stack. The active image must be RGB color.HSB Stack
Converts to a 3-slice (hue, saturation and brightness) stack. The active image must be RGB color. An attempt to perform an unsupported conversion causes a dialog box to be displayed that lists the possible conversions. The * indicates that both single images and stacks can be converted.
![[conversions]](../images/conversions.gif)
Adjust Submenu
This submenu contains commands that adjust brightness/contrast, threshold levels and image size.Brightness/Contrast...
Use this tool to interactively alter the brightness and contrast of the active image. With 8-bit images, brightness and contrast are changed by updating the image's look-up table (LUT), so pixel values are unchanged. With 16-bit and 32-bit images, the display is updated by changing the mapping from pixel values to 8-bit display values, so pixel pixel values are also unchanged. Brightness and contrast of RGB images are changed by modifying the pixel values.Press shift-c to open the B&C window the quick and easy way. If it is already open, it is activated.
The line graph at the top of the window, which us superimposed on the image's histogram, shows how pixel values are mapped to 8-bit (0-255) display values. The two numbers under the plot are the minimum and maximum displayed pixel values. These two values define the display range, or "window". ImageJ displays images by linearly mapping pixel values in the display range to display values in the range 0-255. Pixels with a value less than the minimum are displayed as black and those with a value greater than the maximum are displayed as white.
There are four sliders. Minimum and Maximum control the lower and upper limits of the display range. Brightness increases or decreases image brightness by moving the display range. Contrast increases or decreases contrast by varying the width of the display range. The narrower the display range, the higher the contrast.
Click on Auto, and ImageJ will automatically optimize brightness and contrast based on an analysis of the image's histogram. Create a selection, and the entire image will be optimized based on an analysis of the selection. The optimization is done by allowing a small percentage of pixels in the the image to become saturated (displayed as black or white). Each additional click on Auto increases the number of saturated pixels and thus the amount of optimization.
Click on Reset to restore the original brightness and contrast settings. The display range is set to the full pixel value range of the image. A resetMinAndMax() macro call is generated if the command recorder is running.
Click on Set to enter the minimum and maximum display range values in a dialog box. A setMinAndMax() macro call is generated if the command recorder is running.
Click on Apply to apply the current display range mapping function to the pixel data. If there is a selection, only pixels within the selection are modified. This option currently only works with 8-bit images and stacks and with RGB stacks. This is the only B&C option that alters the pixel data of non-RGB images.
With DICOM images, ImageJ sets the initial display range based on the Window Center (0028,1050) and Window Width (0028,1051) tags. Click Reset and it sets the display range to the minimum and maximum pixel values. As an example, the File>Open Samples>CT image has a Window Center of 50 and Window Width of 500, so the display range is set to -200 to 300 (center-width/2 to center+width/2). Click Reset and the display range is set to -719 to 1402. Press 'h' (Analyze>Histogram) and you will see that the minimum pixel value in the image is -719 and the maximum is 1402. To display the DICOM tags, press 'i' (Image>Show Info). Press 'r' (File>Revert) to revert to the initial display range.
Threshold...
Use this tool to automatically or interactively set lower and upper threshold values, segmenting the image into features of interest and background. The thresholded features are displayed in red and background is displayed in grayscale. Use Analyze>Measure (with "Limit to Threshold" in Analyze>Set Measurements checked) to measure the aggregate of the selected features. Use Analyze>Analyze Particles to measure features individually. Use the wand tool to outline a single feature.Use the upper slider to adjust the minimum threshold value and the lower one to adjust the maximum. Hold the alt key down while adjusting the minimum to move a fixed-width thresholding window across the range of gray values. Check Dark Background if the features are lighter than the background.
Thanks to Gabriel Landini, the drop down menu on the left allows any of 16 different automatic thresholding methods to be selected. These methods are described on Gabriel's Auto Threshold plugin website. The "Default" method is the modified IsoData method used by ImageJ 1.41 and earlier.
Use the drop down menu on the right to select one of three display modes. Red displays the thresholded values in red. B&W switches to a mode where features are displayed in black and background in white. Over/Under displays pixels below the lower threshold value in blue, thresholded pixels in grayscale, and pixels above the upper threshold value in green.
The Auto button uses the currently selected thresholding method to automatically set the threshold levels based on an analysis of the histogram of the current image or selection. Apply sets thresholded pixels to black and all other pixels to white. Reset disables thresholding and update the histogram. Click on Set to enter new threshold levels into a dialog box.
Size...
Scales the active image or selection to a specified width and height in pixels.Check Constrain Aspect Ratio to create an image with the specified width and have ImageJ adjust the height to maintain the original aspect ratio. Check Interpolate to use bilinear interpolation. Set New width to 0 to create an image with the specified height and have ImageJ adjust the width to maintain the original aspect ratio.
Canvas Size...
Changes the canvas size of an image or stack without scaling the actual image. The width and height may be either expanded or contracted. If the canvas size is increased, then the border is filled with the current background color. Or, if Zero Fill is checked, the border is filled with pixels that have a value of zero. Use the Image>Color>Color Picker tool to change the background color. The position of the old image within the new canvas may also be specified.
![[B&C]](../images/adjuster.jpg)
![[Min Max Dialog]](../images/set-min-max.jpg)
![[Threshold Widget]](../images/threshold.png)
![[resize]](../images/resize.gif)
![[Canvas Size]](../images/canvas-size.jpg)
Show Info...
Opens a text window containing information about the active image. For DICOM and FITS images, also displays file header information. Use the popup menu (right-click in the Info window) to save the information to a text file or copy it to the system clipboard.![[getinfo]](../images/getinfo.gif)
Properties...
Use this command to display and set various properties of the current image or stack.![[Dialog]](../images/properties.gif)
The number of Channels, Slices and Frames (c, z, and t) in the image can be changed as long as the product of c, z, and t is equal to the number of images in the stack.
The Unit of Length (a string describing the measuring unit), Pixel Width, Pixel Height and Voxel Depth (all in the Unit of Length unit) can be set. The width, height and depth are automatically converted if Unit of Length is changed from one known unit ("nm", "um", "micron", "mm", "cm", "meter", "km" or "inch") to another.
With t-series stacks, the Frame Interval in seconds (reciprocal of the frame rate) can be viewed and set. Origin (always in pixels) is the reference point (0,0) of the image coordinate system. Check Global to make the current settings global (i.e., apply to all images opened during the current session).
Color Submenu
This submenu contains commands that deal with color images.Split Channels
Splits an RGB image into sepate channels (images). Also splits RGB stacks into three separate stacks. The image names have " (red)", " (green)" and " (blue)" appended to them. With composite images and/or hyperstacks (e.g., the "Organ of Corti" sample image), this command splits the stack into sepate channels.Merge Channels...
Merges 1-4 greyscale images or stacks into an RGB image or stack. Select *None* to keep a channel empty (filled with 0). Check "Create Composite" to convert 2-4 grayscale images or stacks into a composite image or hyperstack. Check "Keep Source Images" if you wish to keep the originals.Arrange Channels...
This command allows you to change the order of the channels in a hyperstack by entering the channel numbers in a different order. Channels that do not appear in the bottom row of thumbnail images will be deleted. Click on any thumbnail image to change that channel's color LUT.When calling this command from script or macro, you also can duplicate channels, e.g.:
run("Arrange Channels...", "new=12333");
Channels Tool...
Opens the "Channels" window, or brings it to the front if it is already open. Shift-z is the keyboard shortcut for this command.Stack to RGB
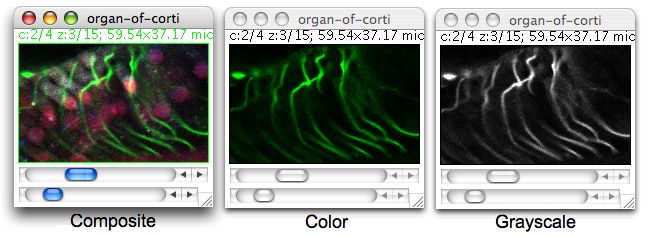
Converts a two or three slice stack into an RGB image, assuming that the slices are in R, G, B order. The stack must be 8-bit or 16-bit grayscale. Also converts composite images (e.g., the HeLa Cells sample image) into RGB.Make Composite
Converts an RGB image, a 2-7 image stack or a 2-7 channel hyperstack into a composite color image. Use the "Channels" tool (press shift-z top open) to enable and disable the channels of a composite image. Use the "B&C" tool (press shift-c to open) to adjust the brightness and contrast of the current channel.
In the example above, all but the red and blue channels of a five channel composite image have been disabled using the "Channels" tool and the "B&C" tool is being used to adjust the brightness and contrast of the blue channel.Show LUT
Displays a plot of the active image's lookup table. The lookup table, or color table, describes the color that is displayed for each of the 256 possible pixel values. For 16 and 32 bit images, the range of displayed pixel values is mapped to 0-255. A bar under the plot displays the color representation of the pixel values. Note that RGB color images do not use a lookup table.Edit LUT
Opens the ImageJ LUT (Lookup Table) Editor. A lookup table (LUT) in ImageJ has up to 256 entries. The entry index, and the three values (red, green and blue) associated with it, are displayed in the ImageJ status bar as you move the cursor over the LUT Editor window. Click on an entry to edit the red, green and blue values for that entry.Drag across several entries and you will be asked to define the RGB starting and ending values for the selected range. The Editor will fill the remaining entries using the selected interpolation method (Replication, Interpolation or Spline Fitting).
You can define the number of entries in the LUT using the "Set" option. When increasing the number of entries, the Editor uses the specified interpolation method. Replication just repeats the entries while Interpolation and Spline Fitting produce gradations between the colors. The "Invert" button sets the inverse of the LUT RGB entries. "Open" and "Save" allow importing or exporting the LUTs.
Color Picker...
The Color Picker tool enables the user to select foreground and background colors, which affect Edit>Fill, Edit>Draw and other color drawing commands. It displays current foreground and background colors in the selection boxes at the bottom of the window. It has two modes: foreground and background. To change modes, click on the desired selection box. Clicking on the Foreground/Background Switcher button sets the current foreground to the background and vice versa. The Black/White Reset button sets the foreground to black and the background to white.The color palette is based on HSB (Hue, Saturation and Brightness) color model. Hue increases as you go down the palette while saturation and brightness values are split horizontally. The left half of the palette varies only in brightness while the right half varies only in saturation. At the center of the color ramp are enlarged red, green, blue, cyan, magenta, and yellow colors for quick selection. To the left of the color palette is a grayscale ramp that goes from pure black to pure white.
Double-clicking on a color brings up the Color Selector, shown on the right in the illustration. Use the sliders to specify the RGB values of the foreground or background color. To get precise colors, manually change the values in the text boxes. The title of the Color Selector window ("Foreground Color" or "Background Color") indicates the current selection mode.
The Color Picker was written by Gali Baler, a 2003-2004 intern from Bethesda-Chevy Chase High School.
![[Screenshot]](../images/arrange.jpg )
![[Composte Image]](../images/composite.jpg )
![[LUT]](../images/lut.gif)
![[LUT Editor]](../images/lut-editor.gif)
![[Color Picker]](../images/picker.jpg)
Stacks Submenu
This submenu contains commands that work with stacks.Add Slice
Inserts a blank slice after the currently displayed slice. Hold down the alt key to add the slice before the current slice.Delete Slice
Deletes the currently displayed slice.Next Slice
Displays the slice that follows the currently displayed slice. As a shortcut, press the ">" key.Previous Slice
Displays the slice that precedes the currently displayed slice. As a shortcut, press the "<" key.Set Slice...
Displays a specified slice. The user must enter a slice number greater than or equal to one and less than or equal to the number of slices in the stack.Convert Images to Stack
Creates a new stack consisting of all images currently displayed in separate windows. The images must all be the same type and size.Convert Stack to Images
Converts the slices in the current stack to separate image windows.Make Montage
Produces a single image which contains the images from a stack displayed in a grid format. This can be useful for visual comparisons of a series of images stored in a stack. A dialog box allows you to specify the magnification level at which the images are copied, and to select the layout of the resulting grid. With ImageJ 1.35m or later, check Use Foreground Color to draw borders and labels in the foreground color and to fill blank areas with the background color. Use the Montage Shuffler tool macro to reorder the images in the montage.Reslice...
Reconstructs one or more orthogonal slices through the image volume represented by the current stack. A dialog allows you to specify the spacing of the reconstructed slices.Output spacing determines the number of orthogonal slices that will reconstructed. Increasing Output spacing reduces the size of the output stack. With straight line selection, the number of orthogonal slices generated is determined by the value of the "Slice count"�field. Output spacing is ignored with line selections and one orthogonal slice is generated for each time point.
The Start at menu has four choices:
Start at is replaced by Slice count if there is line selection. With lines selections, a stack is created by shifting (by Output spacing) the line down and to the left to generate additional slices for the output stack. In this case, the size of the output stack in determined by Slice count.
- Top - Start reconstructing slices at the top of the image
- Left - Start reconstructing at the left edge of the image
- Bottom - Start reconstructing at bottom of the image
- Right - Start reconstructing at the right edge of the image
Check Flip vertically and each slice in the output stack will be flipped vertically. Check Rotate 90 degrees and each slice in the output stack will be rotated 90 degrees. Check Avoid interpolation and no interpolation will be done.
The estimated size of the output stack and the amount of available memory are displayed at the bottom of the dialog. Increase Output Spacing to reduce the size of the output stack.
This plugin, and the ZProject plugin, were contributed by Patrick Kelly and Harvey Karten of the University of California, San Diego.
ZProject...
Projects an image stack along the axis perpendicular to image plane (the so-called "z" axis). Four different projection types are supported. Average Intensity projection outputs an image wherein each pixel stores average intensity over all images in stack at corresponding pixel location. Maximum Intensity projection creates an output image each of whose pixels contains the maximum value over all images in the stack at the particular pixel location. Sum Slices creates a real image that is is sum of the slices in the stack. Standard Deviation creates a real image containing the standard deviation of the slices.3D Project...
Generates an animation sequence by projecting through a rotating 3D data set onto a plane. Each frame in the animation sequence is the result of projecting from a different viewing angle. To visualize this, imagine a field of parallel rays passing through a volume containing one or more solid objects and striking a screen oriented normal to the directions of the rays. Each ray projects a value onto the screen, or projection plane, based on the values of points along its path. Three methods are available for calculating the projections onto this plane: nearest-point, brightest-point, and mean-value. The choice of projection method and the settings of various visualization parameters determine how both surface and interior structures will appear.This routine was written by Michael Castle and Janice Keller of the University of Michigan Mental Health Research Institute (MHRI).
Select Nearest Point projection to produce an image of the surfaces visible from the current viewing angle. At each point in the projection plane, a ray passes normal to the plane through the volume. The value of the nearest non transparent point which the ray encounters is stored in the projection image. Brightest Point projection examines points along the rays, projecting the brightest point encountered along each ray. This will display the brightest objects, such as bone in a CT (computed tomographic) study. Mean Value projection, a modification of brightest-point projection, sums the values of all transparent points along each ray and projects their mean value. It produces images with softer edges and lower contrast, but can be useful when attempting to visualize objects contained within a structure of greater brightness (e.g. a skull).
Slice Interval is the interval, in pixels, between the slices that make up the volume. ImageJ projects the volume onto the viewing plane at each Rotation Angle Increment, beginning with the volume rotated by Initial Angle and ending once the volume has been rotated by Total Rotation.
The Lower and Upper Transparency Bound parameters determine the transparency of structures in the volume. Projection calculations disregard points having values less than the lower threshold or greater than the upper threshold. Setting these thresholds permits making background points (those not belonging to any structure) invisible. By setting appropriate thresholds, you can strip away layers having reasonably uniform and unique intensity values and highlight (or make invisible) inner structures. Note that you can also use Image>Adjust>Threshold to set the transparency bounds.
Sometimes, the location of structures with respect to other structures in a volume is not clear. The Surface Opacity parameter permits the display of weighted combinations of nearest-point projection with either of the other two methods, often giving the observer the ability to view inner structures through translucent outer surfaces. To enable this feature, set Surface Opacity to a value greater than zero and select either Mean Value or Brightest Point projection.
Depth cues can contribute to the three-dimensional quality of projection images by giving perspective to projected structures. The depth-cueing parameters determine whether projected points originating near the viewer appear brighter, while points further away are dimmed linearly with distance. The trade-off for this increased realism is that data points shown in a depth-cued image no longer possess accurate densitometric values. Two kinds of depth-cueing are available: Surface Depth-Cueing and Interior Depth-Cueing. Surface Depth-Cueing works only on nearest-point projections and the nearest-point component of other projections with opacity turned on. Interior Depth-Cueing works only on brightest-point projections. For both kinds, depth-cueing is turned off when set to zero (i.e. 100% of intensity in back to 100% of intensity in front) and is on when set at 0<n 100 (i.e. (100-n)% of intensity in back to 100% intensity in front). Having independent depth-cueing for surface (nearest-point) and interior (brightest-point) allows for more visualization possibilities.
Check Interpolate to generate a temporary z-scaled stack that is used to generate the projections. Z-scaling eliminates the gaps seen in projections of volumes with slice spacing greater than 1.0 pixels. This option is equivalent to using the Scale plugin from the TransformJ package to scale the stack in the z-dimension by the slice spacing (in pixels). This checkbox is ignored if the slice spacing is less than or equal to 1.0 pixels.
Plot Z-axis Profile
Plots the ROI selection mean gray value versus slice number. Requires a selection.Label
Adds a sequence of numbers (e.g., timestamps) and/or a label to a stack, hyperstack or virtual stack. The numbers are drawn in the current foreground color, which is set using the color picker (Image>Color>Color Picker). The initial XY location and font size are based on the existing rectangular selection, if any.Format specifies the structure of the timestamp/label:
Starting value and Interval specifiy the first value and the numeric step to be applied. Slices outside the specified Range are not affected.
- "0": Draw unpadded numbers
- "0000": Numbers are padded with leading zeros
- "00:00": Draw minutes:seconds timestamps
- "00:00:00": Draw hours:minutes:seconds timestamps
- "Text": Draw only the contents of the Text field
- "Label": Displays slice labels
Text is the label to be drawn when the format is "Text", or the string drawn after each number (before it if the format is "0000").
Enable Use overlay and the timestamps and/or labels will be drawn in a non-destructive graphic overlay. Use the commands in the Image>Overlay submenu to hide, show or remove the overlay. Note that previously added overlays will be removed and virtual stacks can only have overlay labels.
Enable Use text tool font and labels will be created using the typeface and style specified in the Edit>Options>Fonts dialog box (example macro).
Combine
Combines two stacks (w1xh1xd1 and w2xh2xd2) to create a new w1+w2 x max(h1,h2) x max(d1,d2) stack. For example, a 256x256x40 and a 256x256x30 stack would be combined to create one 512x256x40 stack. If Combine vertically is enabled, creates a new max(w1+w2) x (h1+h2) x max(d1,d2) stack. Unused areas in the combined stack are filled with the background color.Concatenate
Concatenates two images or stacks that have the same width, height and data type.Start Animation
Animates the active stack by repeatedly displaying its slices (frames) in sequence. Use Stop Animation, or click with the mouse, to stop. Open the Animation Options dialog box to specify the animation speed. More than one stack can be animated at a time. As a shortcut, press the backslash key ("\") to start or stop animation. In ImageJ 1.38 and later, press alt plus backslash to open the Animation Options dialog.Stop Animation
Terminates animation of the active stack. As a shortcut, press the backslash key.Animation Options...
Use this dialog to set the animation speed in frames per second, set the starting and ending frame (1.38 or later), or to enable "oscillating" animation. In ImageJ 1.38 or later, you can press alt plus backslash to display this dialog.
![[Dialog]](../images/reslice.png)
![[Dialog]](../images/project.jpg)
![[Dialog]](../images/label.png)
![[Dialog]](../images/animation-options.gif)
Hyperstacks Submenu
This submenu contains commands that work with hyperstacks, images that have four (4D) or five (5D) dimensions. This is what a hyperstack looks like: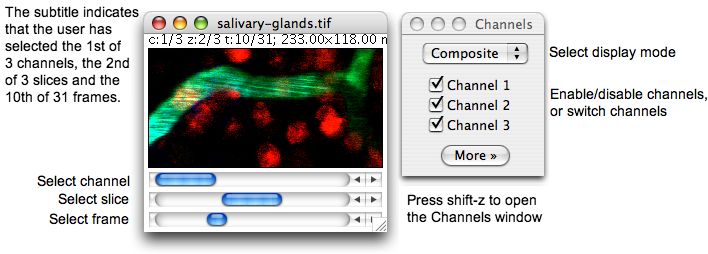
Press shift-z (Image>Hyperstacks>Channels) to open the "Channels" window and you will be able to switch display modes (composite, color or grayscale) and enable/disable channels.
New Hyperstack...
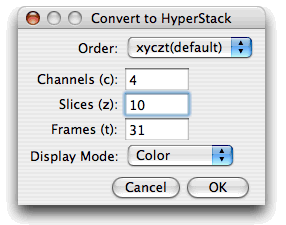
Creates a new hyperstack. Hyperstacks have width, height, channels (c dimension), slices (z dimension) and time frames (t dimension). Check "Label Images" in the dialog and the channel number, slice number and frame number will be drawn on each image in the stack.Stack to Hyperstack
Converts a stack into a hyperstack. RGB stacks are converted into 3 channel hyperstacks.Order is the the order of the channels (C), slices (Z) and frames (T) within the stack. ImageJ hyperstacks are always in CZT order. Stacks not in CZT order will be shuffled to be in CZT order. The channel Display Mode can be Composite, Color or Grayscale.
Hyperstack to Stack
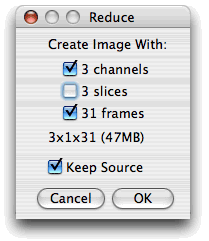
Converts a hyperstack into a stack.Reduce Dimensionality...
This command reduces the dimensionality of an hyperstack by creating a new hyperstack with, for example, all the channels and time points at a given z position or all the z slices for the current channel and time point.Uncheck n Channels to delete all but the current channel, n Slices to delete all but the current z slice and n Frames to delete all but the current time point. The expected dimensions and size of the reduced stack are displayed in the dialog. Check Keep Source and the original stack will not be deleted.
Channels...
Opens the "Channels" window, or brings it to the front if it is already open. Shift-z is the keyboard shortcut for this command.
Crop
Crops the image or stack based on the current rectangular selection. With ImageJ 1.38 or later, you can crop by pressing shift-x.Duplicate
Creates a new window containing a copy of the active image or rectangular selection. Hold the alt key down to skip the dialog box.Scale...
Resizes the image or selection horizontally and/or vertically by scale factors entered into a dialog box. Check Interpolate to scale using bilinear interpolation. Use integer scale factors (2, 3, 5, etc.) for the best looking results, particularly with graphics and text. With scale factors less then 1.0, smoothing the source image prior to scaling may produce better looking results.![[scale]](../images/scale.gif)
Translate...
Translates (moves) the image in the x and y directions by a specified number of pixels. With stacks, you can translate either the current image or all the images in the stack. Check Preview to see how the translation will affect the image. The background at the edges of the image will be set to 0.![[Dialog]](../images/translate.gif)
The Align RGB Planes and Align Slice plugins on Gabriel Landini's Software page are similar, but more interactive.
Rotate Submenu
This submenu contains commands that rotate the active image or stack.Flip Vertical
Turns the image or selection upside down.Flip Horizontal
Replaces the image or selection with a mirror image of the original.Rotate 90 Degrees Right
Rotates the entire image or stack clockwise 90 degrees.Rotate 90 Degrees Left
Rotates the entire image or stack counter-clockwise 90 degrees.Arbitrarily...
Use this dialog to rotate the active image or selection clockwise the specified number of degrees. Set Grid Lines to a value greater than zero to superimpose a grid on the image in preview mode. Check Interpolate to use bilinear interpolation. With 8-bit and RGB images, check Fill with Background Color to fill with the backgound color instead of zero. Double click on the eye dropper tool to set or view the background color. Check Enlarge to Fit Result and the image will be enlarged as needed to avoid clipping.
![[dialog]](../images/rotate.jpg)
Zoom Submenu
This submenu contains commands that control how the current image is displayed. The "+" and "-" keys are the preferred way to use the In and Out commands.In
Zooms in to next higher magnification level and, if possible, enlarges the window. Use the "+" key as a shortcut. Hold down the shift key to prevent the window from being enlarged. Hold down the space bar and drag to scroll the zoomed image. Double-click on the magnifying glass tool to revert to the magnification used when the image was first opened. There are 21 possible levels (shown in title bar): 3.1, 4.2, 6.3, 8.3, 12.5, 16.7, 25, 33.3, 50, 75, 100, 150, 200, 300, 400, 600, 800, 1200, 1600, 2400 and 3200 percent.Out
Zooms out to next lower magnification level and, if needed, shrinks the window. Use the "-" key as a shortcut.View 100%
Displays the image using 100% magnification (1 image pixel = 1 screen pixel). Enable "Open Images at 100%" in the Edit>Options>Appearance dialog to have images automatically opened at 100% magnification.Original Scale
Displays the image at the magnification used when the image was first opened. As a shortcut, double click on the magnifying glass tool.To Selection
Zooms in based on the current selection.
Overlay Submenu (v1.43 and later)
This submenu contains commands for creating and working with non-destructive image overlays. An overlay consists of one or more selections. Press 'b' (Add Selection) to add the current selection to the overlay. Press shift-f (Flatten) to create an RGB image with the overlay embedded in it. The overlay is preserved when an image is saved in TIFF format.![[Overlay]](../images/overlay.jpg)
Add Selection...
Adds the current selection to the overlay. A dialog box is displayed that allows the stroke (line) color, stroke width and fill color to be set. Except for text selections, the stroke color and width are ignored if a fill color is specified. Colors are specified using the name of one of the eight primary colors (e.g., "red", "green", "black") or using hex notation (e.g., "#ff0000", "#00ff00", "#000000"). Non-opaque colors can be specified using 8-digit hex notation, where the first two digits specify the alpha value, for example "#800000ff" (50% blue) and "#40000000" (25% black).Add Image...
Adds an image to the overaly.Hide Overlay
Causes ImageJ to stop displaying the overlay.Show Overlay
Displays an overlay that was hidden by Hide Overlay.From ROI Manager
Creates an overlay from the selections on the ROI Manager list.To ROI Manager
Copies the selections and images in the current overlay to the ROI Manager, where they can be edited (moved, resized or re-colored).Remove Overlay
Permanently clears the overlay so that it cannot be restored using Show Overlay.Flatten
Creates a new RGB image that has the overay rendered as pixel data. The RGB image is the same size as the active image, unlike Plugins>Utilities>Grab Image, which creates a WYSIWYG (What You See Is What You Get) image that is the same size as the window.
Lookup Tables
This submenu contains a selection of color lookup tables that can be applied to grayscale images to produce false-color images. If no image is open, a 256x32 ramp image is created to display the color table. More than 100 additional lookup tables are available at rsb.info.nih.gov/ij/download/luts/. They are also available as a ZIP archive at rsb.info.nih.gov/ij/download/luts/luts.zipInvert LUT
Inverts the current lookup table. For 8-bit images, the value (v) of each entry in the table is replaced by 255-v. With inverted LUTs, pixels with a value of zero are white and pixels with a value 255 are black. Unlike the Edit>Invert command, pixels values are not altered, only the way the image is displayed on the screen.Apply LUT
Applies the current lookup table function to each pixel in the image or selection and restores the default identity function. This modifies the gray values so that when the image is viewed using the default grayscale lookup table it will look the same as it did before. This command is equivalent to clicking on "Apply" in Image>Adjust>Brightness/Contrast. For thresholded images, it is equivalent to clicking on "Apply" in Image>Adjust>Threshold.