NIH Image Macro Language
Examples, Techniques, Operations
What is a macro and why write one?
A macro is text containing a sequence of calls or routines which NIH Image interprets and executes. To write a macro, you can choose "New" then "text window" to create a text window within NIH Image. You load the macro using "Load Macro". A rich set of example macro routines is distributed with the NIH Image program. You can try some of these out and borrow code from them in order to write your own macro.
Simple macros, such as the one below, are useful utilities to save time and effort. This macro is an example of a macro which follows the same operations that could be performed by you from the NIH Image menus. It's operation is to clear anything outside of the Region of Interest (ROI) which you draw. Macros can, of course, be much larger and can include looping, calculations and basically an entire imaging application.
MACRO 'Clear Outside [C]';
 {Erase region outside ROI.}
BEGIN
  Copy;
  SelectAll;
  Clear;
  RestoreRoi;
  Paste;
  KillRoi;
END;
As a general guidline, if you have a highly iterative operation, prolonged calculation, derivation, modification or anything else complex you should consider using a pascal routine for that portion of your coding. The ease of the macro interface with your code executing at compiled pascal execution rates can be done with calls to UserCode in your macro.
Before you begin
It should not be hard for you to start writing a macro. You will want to do several things before you begin. First, go to the " NIH Image 1.xx Manual " file and print the section " Macro Programming Language ". This provides you with a complete list of all macro calls. The list is organized by the NIH Image menus, or the call is categorized as a miscellaneous call or as a miscellaneous function. After you print this section, be sure you understand the organization of the manual by looking at the NIH Image menus and examining the list of calls in the printout. Finally, locate the macros folder distributed with NIH Image. Open, load and examine some of the macros. Try using "Find" from the "Edit" menu on one of the open macros. "Find" is fairly useful in helping you debug a macro. It allows you to go to sources of error when you get error messages during the load or execution of a macro.
For the programming beginner
You probably don't need to study programming to write a macro. Depending on the complexity of your application, you might be able to pick up everything you need by examining some of the macros in the macros folder. To some, a confusing aspect of writing macros is understanding what a function is and how it is used. A function returns a value or a boolean (true/false). In the example below, nPics is a function which will return an integer number of pictures open. KeyDown('option') returns a true or false depending on whether you hold the option key down.
Macro 'Function demo';
begin
 {Here is an example use of the nPics function returning a value}
   showmessage('Number of images open: ',nPics);
 {Here is an example use of keydown function returning a boolean}
  If KeyDown('option') then putmessage('Number of images open: ',nPics);
end;
One text I recomend skimming through is Pascal Programming and Problem Solving, by Leestma and Nyhoff, other texts are listed in the " Macro Programming Language " section of the NIH Image 1.xx Manual
Macro global vs. local vars
Most programming languages like pascal, C, etc, have a local or global variable. A global variable is declared at the top of the macro file and can be utilized by any procedure or macro in the file. A local variable is declared in the procedure or macro in which it is used. For the example macro set below, "A" and "B" are local to the 'Add numbers' macro. "Answer" is globally declared and used by both macros.
VAR
   Answer:real;


Macro 'Add numbers';
Var
   A,B: real;
begin
   A := Getnumber('Enter the first number',2.0);
   B := Getnumber('Enter the second number',3.14);
   Answer := A+B;
end;


Macro 'Show Answer';
begin
   ShowMessage(' The added result is: ', Answer:4:2);
end;
Putmessage, ShowMessage & Write
PutMessage
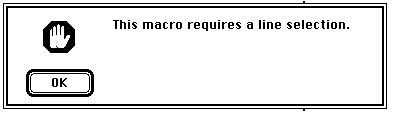
PutMessage is perhaps one of the easiest ways to provide feedback to users. To use putmessage you simply call the routine with the message or string you wish to give to the user.
PutMessage('This macro requires a line selection');
You can pass multiple arguments with PutMessage if you needed to.
PutMessage('There are ', nPics, ' open');
ShowMessage
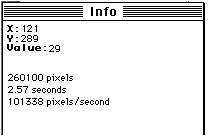
ShowMessage allows display of calculations, data, variables or whatever you caste as a string into the Info window.
Here is a simple example of output to the Info window:
ShowMessage('x1 = ',x1);
You can use the backslash ('\') character to do a carriage return for macros:
ShowMessage('Average Size=',AverageSize:1:2,'\TotalCount=',TotalCount);
Write
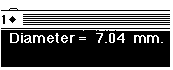 You can also write data or info onto the image window with a macro call to Write or Writeln.
   Diameter := Width / PixelsPerMM; {in MM.}
   MoveTo(300,10);
   Write('Diameter = ', Diameter:5:2,'  mm.');
Number of digits
There are several ways to set the number of digits you use for output with Showmessage, Write, Writeln, putmessage or displaying rUser arrays. One way is to use the SetPrecison macro call.
Macro 'Digits example one';
Var
   A,B, Answer: real;
begin
   SetPrecision(4);
   A := 3.1415962;
   B := 10.0;
   Answer := A*B;
   ShowMessage('The result is: ', Answer);
end;
The answer shown in the Info window will have 4 digits after the decimal.
The other method is to use the form e:f1:f2 where f1 is the field width, and f2 specifies the number of digits to the right of the decimal point.
Macro 'Digits example two';
Var
   A,B, Answer: real;
begin
   A := 3.1415962;
   B := 10.0;
   Answer := A*B;
   ShowMessage('The result is: ', Answer:4:2);
end;
The answer shown in the Info window will have 2 digits after the decimal.
Switching and choosing windows
There are a number of ways to switch between windows in a macro. For the most part you will need to use the PidNumber function to identify a unique ID for that window. Pidnumber is a function which returns a value. For example you might have:
var
  MyPicID:integer;
begin
   MyPicID := PidNumber;
   Duplicate('Duplicate image');
{some process}
   SelectPic(MyPicID); {To go back to the original}
Here the returned value from the PidNumber function was assigned to a variable called MyPicID. The variable MyPicID was then used later on in the macro to select the picture.
As an alternative to SelectPic, you could have used ChoosePic(MyPicID). This would have selected the picture but would not have made it the active front window. This is useful when you flip between many windows, but do not need to activate the window.
As a second alternative, you could can use SelectWindow('Window name') to select the window by its title. But if the named window is closed or non-existent, your macro will end with the ensuing error.
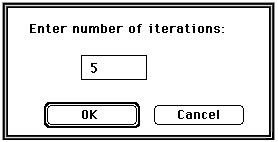
How to input a number or string
Making a call to getnumber will allow you to enter a number into your macro. The GetNumber macro will return a real number, or, if assigned to an integer variable it will not pass the decimal digits should they exist
GetNumber('Prompt', default, d)
Displays a dialog box and returns with the value entered. Prompt is the prompting string. Default is the default value. d (optional) is the number of digits to the right of the decimal point (default is 2). Set d to zero to display an integer default value.
This example displays an integer, then reads in an integer
macro 'Number input example';
var
  MyNumber:integer;
begin
    MyNumber:=GetNumber('Enter number of iterations:',5,0);
    {some process}
end;
The idea is the same for entering a string
macro 'String input';
var
  MyString:string;
begin
    MyString:=GetString('What name?','Data');
   {some process}
end;